Sunday, April 14, 2013

      I never thought when I started writing this blog for fun, that anyone would ever read it...and here you are...all 449 of you...with all your amazingly kind comments and opinions. Thank you for making this more fun than I ever thought it could be! After much thought, I've decided to lay down my "blogging pen." As a wise man once said, "To every thing there is a season, and a time to every purpose under the heaven:" (Ecclesiastes 3:1) 
      This will be the last post here on Morning by Morning Productions, although I'll still leave the blog up for anyone who wants access to any tutorials. Thank you for taking a small chunk of your time to visit with me in my little corner!

P.S. My shop is still open!

Ecclesiastes 3:17   ... for there is a time there for every purpose and for every work. 
Pin It

Monday, April 8, 2013

Anthro Inspired Maxi Skirt Tutorial


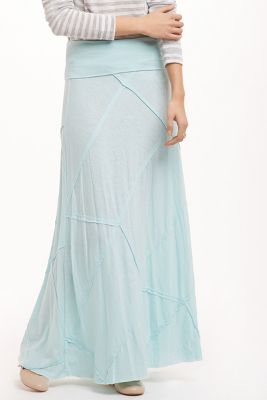
     Back in the day, before we bought this old ramshackled house of our's, that's taken over every spare minute of my time, I used to spend every extra second I could find sewing something. All this painting and whatnot has caused my wardrobe to suffer severely! (Ok, actually not really. I have way more clothes than I need.) Anyway, I did a bit of online shopping looking for some things I might like to freshen up my clothing selection for spring. My idea of "shopping" is to find something I like, and then figure out how to make it myself for a fraction of the cost. I came across this skirt, and I quite liked its casual scrappy look.

Niguel Maxi Skirt

     I used it as my inspiration to make this version. I used a denim-like jersey knit, and made a  basic maxi skirt (tutorial here) with some scrappy goodness added to it.


      If you'd like to give it a try, see my maxi skirt tutorial for what you should cut out. In addition to the waist band and the actual skirt, you'll need to cut out several long strips about a half inch wide. 


      Spread the skirt open and start laying out the strips in the design you like pinning as you go. I flipped my strips wrong side out so that the fabric would contrast, but you don't have to do that.


     I pinned the strips all in place, and did not trim the ends just in-case I wanted to rearrange while sewing.


      I sewed them on, starting front and center, and sewing down the center of the strips. I used a long, narrow zigzag stitch so that the skirt would retain all of it's original stretchyness.


      If you aren't using a walking foot on your machine, you might find that  the fabric wants to bubble and bunch a bit as you sew the strips down. You can fix that by putting your needle down, and lifting your foot to ease out the fabric.


       Once your strips are all sewn on, sew up the back seam. I matched my strips at the seam, but I don't think the Anthro version does, so anyway you like works.


     Finish up with the waist, hem, and press.


       Mine cost me around $10 and it couldn't have been more simple to do.


     Among other things, I am bound and determined to make a decent button down shirt for myself that actually is long enough in the arms and torso! Except, I've never done one before...so we'll see how that goes. Have you done any spring shopping lately? What will you be adding to your wardrobe?

1 Peter 1:24,25   For all flesh is as grass, and all the glory of man as the flower of grass. The grass withereth, and the flower thereof falleth away:  But the word of the Lord endureth for ever.
Pin It

Monday, April 1, 2013

Sewing desk #2 - Ladder style


     So, are you tired of seeing desk/shelving projects around here yet? My work shop room is just about situated the way I want it, so this should be the last one for a little bit.


     I decided to move my little industrial style desk to a different spot in the room and put my serger on it instead of the sewing machine. Therefore, a new solution was needed for the sewing machine. Enter two old wooden ladders. One I found in a closet in this house when we moved in, the other I found at a junk store a while back. Happily, they were the same height and perfect for this project.


      I laid a board across the top and screwed it on from the bottom side.


     I dry brushed it with white, mint green, a bit of orange, and brown.


     I painted a few scrap boards to add some more storage options.


      I already had the chair on hand, which was the perfect height as well.


      Oh, and check it out! I finally got around to painting that cinder block wall to match the other one! While this desk may not be everyone's style, it fits the ticket perfectly for me... sturdy, simple, non-generic, and quite functional. I adore it. (Plus it was free to make, so that's always a major plus!)


       Of course, the reason I needed to do this project, was that I had two little Easter dresses that needed sewing...which may have not been finished until five minutes before walking out the door Easter morning...


      ...and my little girl's were just as pretty at two little robin's eggs...but, maybe I should consider not procrastinating next year...but, that's a different tale for a different time.


   Psalms 37:39   But the salvation of the righteous is of the LORD: he is their strength in the time of trouble